Working on a coding project with my husband: Setting up a deployment pipeline (part 1)
26 Mar 2024Recently my husband needed to set up a deployment pipeline for a project at work. We discussed it briefly and it made me think that I have very little experience with setting up such things from scratch. I’ve written a github action to deploy my blog to AWS, but that was a very cumbersome script. Since we have this project, I decided to go ahead and figure out a way to deploy it somewhere.
My end goal was to have a full set up that would make the deployments and collaboration on the project as smooth as possible:
- Basic checks (linter, unit tests) on each pull request to prevent faulty code from being merged.
- A niice way to display the check results.
- Similar basic checks on the master branch after the changes were merged, but before the deployment.
- The actual deployment to the server
This time I want to share what I did in more detail, so someone could use this post as a reference. I will split it into two parts:
- Part 1: Setting up the integration (this post)
- Part 2: Actual steps of the deployment pipeline
Getting the server
First things first. I needed somewhere to deploy our service. I wanted the most basic setup possible, so I rented the cheapest server from dedikuoti.lt. The process was super easy. Their homepage already contains a list of servers and pricing. You choose one of them + some basic config, pay for it and get the login information for the admin website by mail. From the admin website you can install the chosen operating system (I went with Ubuntu) and find the credentials for ssh’ing to the server.
The only weird thing was that after a few days they called me to ask if my onboarding process was smooth. The caller introduced themselves as “Internet vision” so my initial response was that maybe they got the wrong person as I haven’t changed my internet plan recently.
Initial setup on the server
Probably the only time when I set up a computer from scratch was when I installed Ubuntu to my personal computer. That was more a guess work than an informed process, so I asked Vytautas what he usually does, as he gets to do this at work with some regularity. The steps he suggested:
- Create a new user:
sudo useradd -m <username> - Add the user as sudoer:
sudo adduser <username> sudo - Change password for the root user
- Change default shell from sh to bin/bash
Choosing which CI/CD tool to use
I googled things like “top ci cd tools 2023”. Out of all the tools mentioned 3 were at least somewhat familiar for me:
- Jenkins - we use it at work
- CircleCI - I know a friend uses it, as I remember him complaining about having to change all secrets
- Travis - I’ve seen it used for some smaller projects at work
My initial idea was to go with CircleCI, as for some reason I assumed it would be much easier than e.g. Jenkins. Once I’ve started setting it up I came across come limitations on how it integrates with GithubChecks:
The GitHub Checks feature is not currently supported for projects that have integrated with the CircleCI GitHub App. To find out if you authorized through the GitHub OAuth app or the CircleCI GitHub App, see the GitHub App integration page.
This is something that I wanted to use, so it made me get back to looking into Jenkins. I should have probably chosen it in the first place, as getting to tinker with the builds is one of my favorite tasks at work and I would like to understand it better. I also love that their logo is still changed to support Ukraine during the war.
![]()
Setting up Jenkins
I won’t go into great detail here as there are a lot of blog posts about setting up CI/CD pipelines with Jenkins and Github. I’ll share links to some of those posts as well as some caveats that took me some time to figure out.
Installing Jenkins. Here is a good blog post that describes how to do that. Of course the most important question to answer at this point is where do you want to install it. Since we are only at the tinkering phase of our project I’ve installed Jenkins on the same machine from dedikuoti.lt.
Connecting to Github. From the little exploration I did with CircleCI the principle for integrating a CI/CD tool with Github repo seems quite generic:
- Setup deploy keys for the Github repository
- Add the private key to CI/CD credentials
- Create a config file so the tool would know what it needs to do with that specific project
I followed this guide for how to do this for Jenkins specifically. Though I have to admit it didn’t go as smoothly as expected. Here are a few things to have in mind:
- Make sure git is installed on your server. I kept getting an error
Error performing git command jenkins. It took me a while to realize that I’m working on a machine with just the basic Ubuntu setup andgitis not part of it. This stackoverflow post helped me out. - In case you are having problems with adding the Github’s public key to known hosts. After I got through
Error performing git command jenkinsI hitfatal: Could not read from remote repository. Please make sure you have the correct access rights and the repository exists. I was able to connect to Github directly from the server, with my admin user, but in Jenkins I kept getting this error. What eventually worked for me was changing the SSH Host Key Verification setting to ‘Accept first connection’.
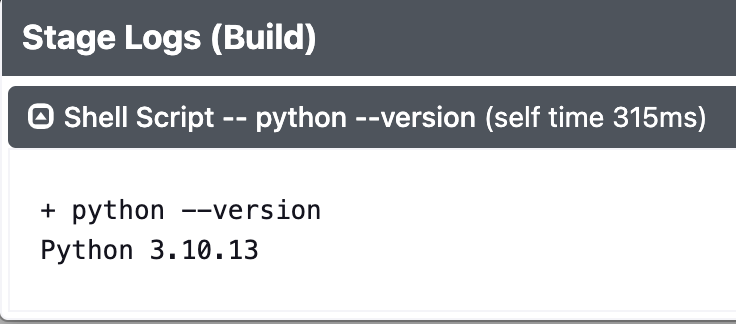
My first Jenkinsfile. Well, maybe not exactly my first as I use Jenkins at work, but certainly the first time I’m setting up everything from scratch. For now I set up a dummy Jenkins integration, just to see that it runs:
pipeline {
    agent { docker { image 'python:3.10-alpine' } }
    stages {
        stage('Build') {
            steps {
                sh 'python --version'
            }
        }
    }
}
Yet I already made sure these 2 things are covered:
- For the checks to run on all branches (i.e. main and feature branches)
- For the checks to run on the same base Docker image that the code will have to run in “production”.
The first point is covered by Jenkins Multibranch Pipeline. The second one can be covered by using the same base docker image that I use for my project for the Jenkins agent. In the most basic approach that can mean just using the same e.g. python image. To be able to do that you will need to add Docker Pipeline Plugin to your Jenkins.
Note: If you don’t have it installed on your machine yet, you will need to install docker and add the Jenkins user to the Docker group
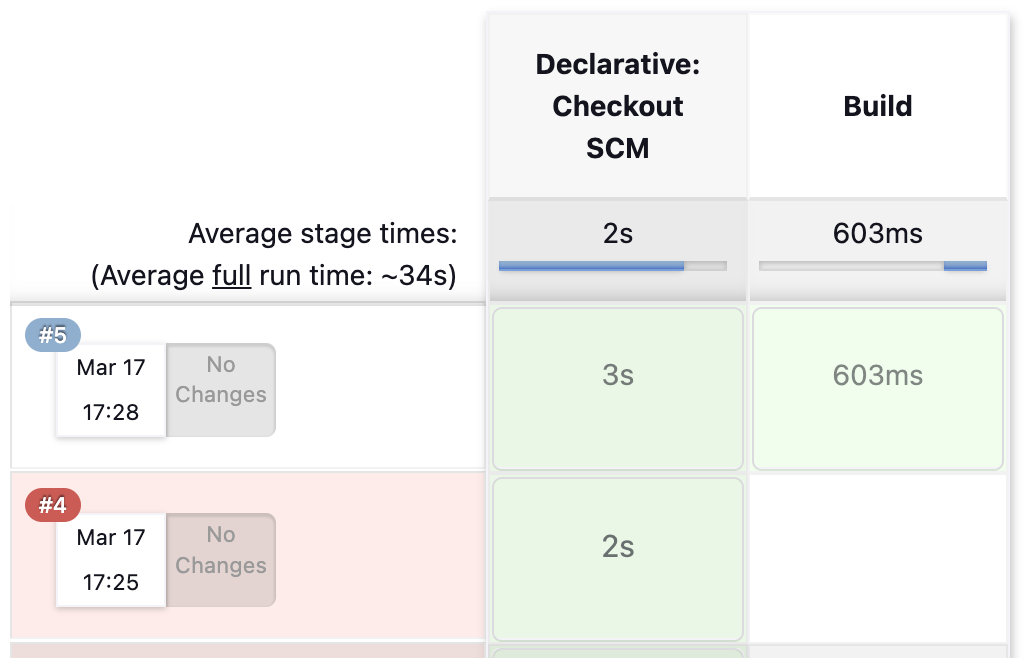
En voila!
After going through all the steps described above I finally have a green Jenkins pipeline for our repository:
And I am able to see the logs for my dummy “Build” stage:
In the second part of this story I plan to share the actual Jenkinsfile I will come up with.